Getting SAM 2 running on Windows without losing your mind
A step-by-step walkthrough of installing Meta’s Segment Anything Model 2.1 (SAM 2.1)
on Windows, what’s actually going on under the hood, and how I plugged it into
segment-geospatial to slice up a big aerial scene into ~300 segments with zero
labeled data.
SAM 2.1 · HieraWindows · CUDA · PyTorchDec 2025 · ~14 min read
For the last few weeks I’ve been living inside Meta’s Segment Anything Model 2.1 (SAM 2.1)
and a pile of aerial imagery.
This post is my own breadcrumb trail: how I installed SAM 2.1 on Windows, what’s actually
going on under the hood, and how I plugged it into segment-geospatial to slice up a big
aerial scene into ~300 segments with zero labeled data.
If future-me forgets how any of this works, this is where I come back.
1. Setting Up SAM 2.1 on Windows
I’m running SAM 2.1 inside a dedicated conda environment with Python 3.11 and GPU-enabled PyTorch.
SAM 2.x wants Python ≥ 3.11, so I locked that in from the beginning.
1.2. Install PyTorch with CUDA
Inside that environment, I installed PyTorch + CUDA that matches my system. The exact command will
depend on your GPU & CUDA version, but the pattern looks like:
Terminal · PyTorch + CUDA
# Example – replace with the command from PyTorch's website for your setup
pip install torch torchvision --index-url https://download.pytorch.org/whl/cu124
I double-checked that CUDA was visible from Python:
Python
import torch
print(torch.cuda.is_available())  # True is what you want
If this prints False, you’re not really using the GPU yet—time to fix your drivers / CUDA install.
1.3. Clone and install SAM 2
Then I pulled the official SAM 2 repo and installed it in editable mode:
Terminal · SAM 2 repo
git clone https://github.com/facebookresearch/sam2.git
cd sam2
pip install -e ".[demo]"
On Windows, that last line was a little flaky for me, so when it failed I just installed the
important pieces manually:
Terminal · extra deps
pip install opencv-python matplotlib notebook
1.4. Download the SAM 2.1 checkpoints
Meta ships several model sizes (Hiera-B, Hiera-L, etc.). The repo has a helper script called
download_ckpts.sh, but that’s a Bash script and Windows doesn’t love .sh by default.
So I had two options:
run the script in WSL / Git Bash, or
manually download the .pt files from the links in the README / model card and drop them
into a checkpoints/ folder.
1.5. Sanity check: can the model actually segment something?
Once the code and checkpoints were in place, I did a tiny inference test on a single image.
Python · quick smoke test
import cv2
import numpy as np
import torch

from sam2.build_sam import build_sam2
from sam2.sam2_image_predictor import SAM2ImagePredictor

device = "cuda" if torch.cuda.is_available() else "cpu"

checkpoint = "checkpoints/sam2_hiera_large.pt"
config = "configs/sam2_hiera_l.yaml"

# build model
sam2_model = build_sam2(config, checkpoint, device=device)
predictor = SAM2ImagePredictor(sam2_model)

# load an image
image = cv2.imread("test.jpg")
image = cv2.cvtColor(image, cv2.COLOR_BGR2RGB)

# set the image for the predictor
predictor.set_image(image)

# point prompt at (100, 150)
point_coords = np.array([[100, 150]])
point_labels = np.array([1])   # 1 = foreground, 0 = background

masks, scores, logits = predictor.predict(
    point_coords=point_coords,
    point_labels=point_labels,
    multimask_output=True,
)

print("Got", len(masks), "candidate masks")
If this runs without errors and prints a few masks, congrats: SAM 2.1 is alive and talking to your GPU.
1.6. Little Windows gotchas
A couple of small potholes I hit and fixed:
CUDA mismatch: PyTorch needs to match your installed CUDA toolkit. If things break during
import, re-install PyTorch with the exact command from their website.
CUDA_HOME: some builds want CUDA_HOME set. On Windows, I pointed it at my
toolkit folder, e.g.:
Command Prompt
set CUDA_HOME="C:\Program Files\NVIDIA GPU Computing Toolkit\CUDA\v12.4"
Once all of that was stable, I moved from “cool demo” to “how does this thing actually work?”
2. How SAM 2.1 Thinks: A Quick Mental Model
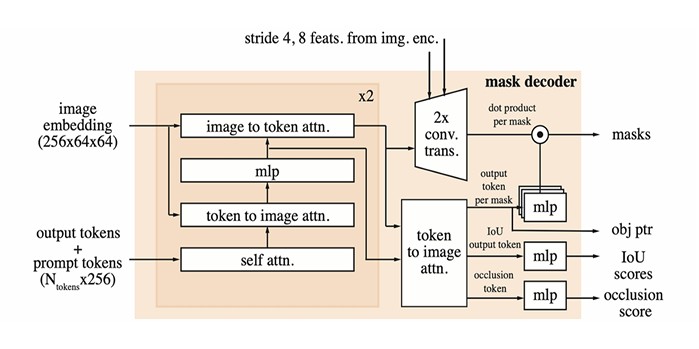
High-level architecture of Segment Anything Model 2 (SAM 2), showing how it processes
video frames with memory. In each frame, SAM2’s image encoder processes the frame,
memory from previous frames is used to inform the mask decoder, and prompts
(points/boxes/masks) can be applied at any frame.
SAM 2 is a big model with several moving parts. Here’s my mental model of how it works under the hood.
2.1. Image encoder – Hiera
SAM 2 uses a hierarchical Vision Transformer called Hiera as its image encoder.
It processes each frame (or image) and produces a stack of multi-scale feature maps.
For a single image, it feels very similar to SAM 1’s ViT encoder: big image in → dense embedding out.
Think of this as: “I’ve turned your pixels into a language I can reason about.”
2.2. Prompt encoder – your way of pointing
Just like SAM 1, SAM 2 listens to prompts:
Points / boxes → turned into “sparse” embeddings with positional encodings.
Masks as prompts → run through a small conv net to become a “dense” embedding.
This is how you tell the model: “I care about this thing, not the whole scene.”
2.3. Memory bank – SAM’s long-term attention span
This is where SAM 2 goes beyond SAM 1.
For videos, after you segment an object in a frame:
SAM 2 stores feature maps for that frame
plus compact object pointers that summarize what that object looked like.
When a new frame arrives, SAM 2:
runs the image encoder again,
then uses memory attention to cross-attend the current features with memories from previous frames.
Result: it can track the same object across time without you re-prompting every frame.
For a single still image, there is no past, so the memory machinery is basically idle and SAM 2 behaves
like a very strong SAM 1.
2.4. Mask decoder – turning understanding into pixels
The mask decoder:
takes the image features (possibly enhanced with memory)
and the prompt embeddings
and runs a few rounds of transformer-style two-way attention to spit out segmentation masks.
Just like SAM 1, if a prompt is ambiguous, it can output multiple candidates. SAM 2 adds an extra
trick: a head that can say “the object is not in this frame” which matters a lot in video when things move
off-screen.
2.5. Memory encoder – writing back to the brain
After predicting a mask for the current frame, SAM 2 has a memory encoder that:
compresses that mask + image features
and writes them back into the memory bank (usually in some FIFO style).
Over time, it builds a rolling memory of what the object has looked like in recent frames.
SAM 2.1 is basically an upgraded checkpoint of this architecture: same structure, just trained more and
tuned better, especially for small / tricky / occluded things.
Once I felt like I had a handle on that mental model, I moved to the fun part: geo stuff.
3. Bringing SAM into the Geospatial World with segment-geospatial
Next stop: segment-geospatial
(a.k.a. samgeo) – a Python package that wraps SAM for working with GeoTIFFs and other spatial imagery.
The dream here is simple: “Give me a satellite or aerial image and let SAM carve it into meaningful regions without me drawing polygons for hours.”
3.1. Installing segment-geospatial
Inside the same sam2 environment:
Terminal · samgeo
pip install -U segment-geospatial
The author (Dr. Qiusheng Wu) has already wired in support for SAM 2, usually exposed as SamGeo2 in the API.
3.2. Test image
For my tests I used a high-resolution aerial image of a residential area:
houses
roads
yards
trees
Basically the kind of scene you’d normally digitize by hand in GIS.
4. First Attempt: Prompt-based Segmentation (and a Facepalm)
My first instinct was: “Let’s click on a building and get just that building back.”
I tried to use SamGeo directly in predictor mode and ran into:
Python traceback
AttributeError: 'SamGeo' object has no attribute 'predictor'
Which was the library gently saying: “You’re using me in the wrong mode, my dude.”
The important realization:
For interactive prompts with SAM 2, you want SamGeo2
and you want automatic=False so it acts like a predictor instead of running full automatic mask generation.
Once I re-wired my code that way, prompt-based prediction started making sense. But before I went too deep on
that, I decided to see what full auto could do.
5. Letting SAM Go Wild: Automatic Mask Generation
To really stress test SAM 2.1 on the aerial image, I switched to automatic segmentation.
Python · auto masks
from samgeo import SamGeo2

sam = SamGeo2(
    model_id="sam2-hiera-large",
    automatic=True,
)

sam.generate(
    source="sample_aerial.tif",
    output="output_mask.tif",
)
This tells segment-geospatial:
load the image (GeoTIFF or similar)
run SAM’s Automatic Mask Generator
save the result as a GeoTIFF mask, with each segment encoded as a unique integer.
5.1. Memory + bit depth issues
My test image was pretty large, so:
the run was GPU + RAM heavy, but still finished
the output contained ~294 segments (!)
The first time I tried saving the mask, I hit:
Python error
OverflowError: Python int too large to convert to uint8
Totally fair – 294 segment IDs don’t fit in an 8-bit range cleanly. The fix was to bump the output to a higher
bit depth (e.g. uint16) so all IDs are preserved. Once I adjusted the save settings,
output_mask.tif wrote cleanly.
5.2. What the result looked like
Visualizing that mask with a random colormap gave me a very colorful picture:
each house = its own blob of color
long continuous stretches of road = distinct segments
trees and vegetation = separate patches
The crazy part is: SAM 2.1 was never trained specifically on satellite imagery, but still partitioned the
scene into reasonable units just by visual distinctiveness.
Zero labeled data. One pass. Nearly 300 regions.
6. What I’ve Actually Achieved (So Far)
Here’s what I can do now, end-to-end:
Spin up a Windows + CUDA + PyTorch environment and run SAM 2.1 on GPU.
Understand enough of the architecture (image encoder, prompts, memory, decoder) to reason about what it’s
doing, not just treat it like magic.
Use segment-geospatial to:
run automatic segmentation on an aerial image and write out a georeferenced mask
get ~300 meaningful segments in one go, saved as a GeoTIFF
That’s already useful: I can convert that mask into polygons and feed them into QGIS / ArcGIS for measuring
areas, filtering by size, or intersecting with other layers.
7. Where I Want to Take This Next
I’m nowhere near done with this pipeline. The to-do list looks like this:
7.1. Filter and label the segments
SAM doesn’t know what the segments are, only that they’re visually distinct.
Next step:
identify which segments are buildings, roads, trees, water, etc.
experiment with text prompts + CLIP-style filtering (segment-geospatial supports some of this)
or bring in a simple classifier that works on crops of each segment.
7.2. Go back to interactive prompts
Now that I know how to correctly initialize SamGeo2 in predictor mode, I want to:
click once inside each building and instantly get precise building footprints
use this to speed up manual mapping instead of replacing it entirely
HQ-SAM integrations in segment-geospatial for sharper boundaries
dedicated geospatial fine-tunes like GeoSAM for road and infrastructure mapping
7.4. Post-processing and simplification
With ~294 segments, some are:
too tiny
or too fragmented to be useful.
The plan:
convert the raster mask → polygons
dissolve tiny regions or adjacent pieces that clearly belong together
drop noise segments with very small area
Classic GIS cleanup.
7.5. Vectorization and full GIS workflows
Because the outputs are georeferenced, I can:
export to Shapefile / GeoJSON
pull them into QGIS / ArcGIS
overlay with parcels, zoning, risk layers, etc.
There’s even a QGIS plugin (GeoOSAM)
using SAM 2.1 directly, which tells me I’m not the only one walking this path.
7.6. Time series and change detection
This is the really fun idea:
use SAM 2.1’s video abilities on multi-temporal imagery
treat each timestamp as a frame in a “video”
track objects across time to see things like:
deforestation
new buildings
changing water bodies
Haven’t built this yet, but with the memory mechanism, SAM 2.1 is basically begging to be used on time
series.
If you made it this far: thanks. This post is mostly here so I don’t forget how any of this works six months
from now, but if it helps you get SAM 2.1 running on your own machine, or convinces you to throw it at
satellite images, then it did its job.